- Google Tag Manager (GTM)
- Google Analytics 4 Integration
- Google Ads Integration
- Meta (Facebook) Pixel Integration
- Tiktok Pixel Integration
- Snapchat Pixel Integration
- Microsoft Ads (UET) Integration
- LinkedIn Insight Tag Integration
- Pinterest Tag Integration
- Twitter (X) Tag Integration
- Session Recording & Heatmaps
- Need Support?
This section helps you activate tracking for analytics and ad platforms like GA4, Google Ads, Meta Pixel, TikTok, and more with or without WooCommerce.
If you're on the Free plan, you can set up browser-based tracking in minutes.
On the Pro plan, you unlock powerful server-side features like CAPI and enhanced conversions.
Google Tag Manager (GTM) #
Use GTM to manage your tracking tags instead of adding each pixel manually.
- Go to Conversios → Pixel & Analytics → Google Tag Manager in your WordPress dashboard.
- Choose your GTM method:
– Default container (pre-loaded, no setup needed)
– Use your own container (sign in with Google and select your GTM container) - You can also switch to Manual mode and paste your container ID directly.
- (Optional) Turn on Consent Mode v2 if you’re using CookieYes, CookieBot, or another CMP.
- Click Save to apply your selection.
- Open GTM in Preview mode or use Tag Assistant to confirm key events like purchase, add_to_cart, and view_item.
ℹ️ If you're a Pro user and need access to the default Conversios GTM container,
please contact [email protected].
Google Analytics 4 Integration #
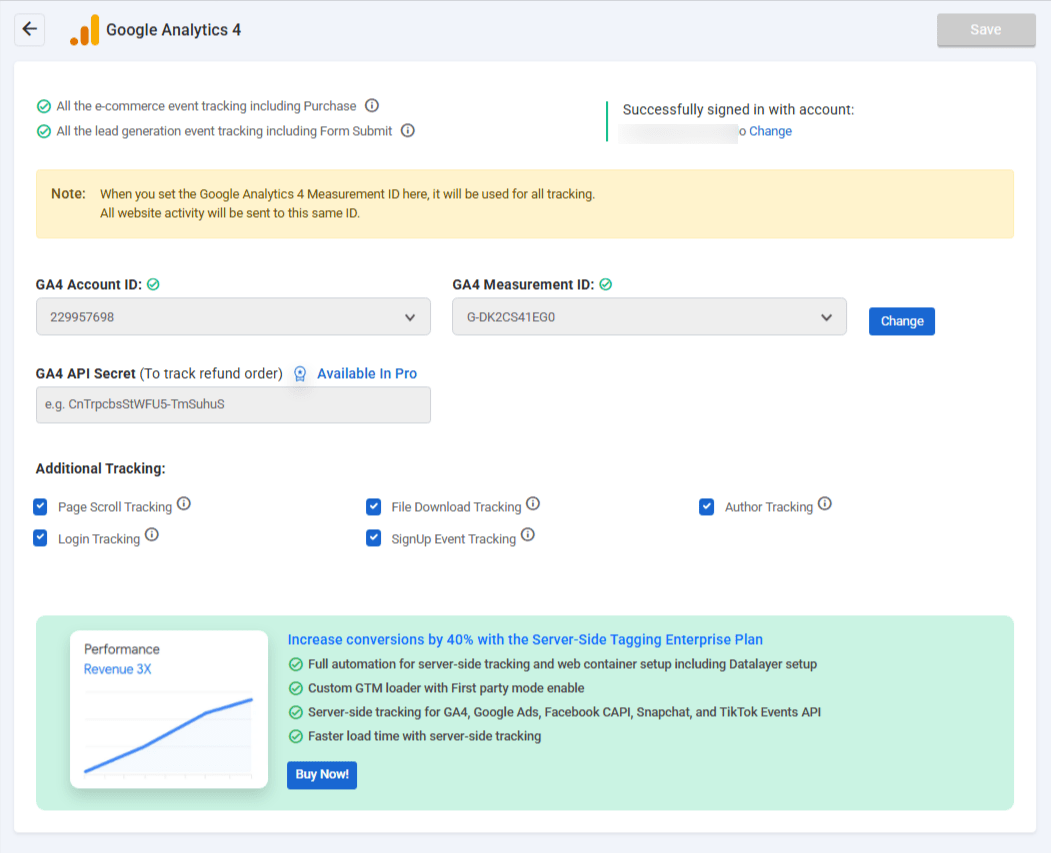
This section helps you activate GA4 tracking for both lead generation and eCommerce events. You only need your Measurement ID, no coding is required.
- Go to Conversios → Pixel & Analytics → Google Analytics 4 in your WordPress dashboard.
- Sign in with your Google account to see your GA4 Account and Property.
- Paste your Measurement ID (e.g.,
G-XXXXXXXXXX) to activate tracking. - Enter your GA4 API Secret to track refund events [Pro Only].
- Enable additional tracking options (Page Scroll, SignUp, Login, etc.)
- Click the blue Save Settings button.
To test if tracking is working:
- Interact with your site (e.g., scroll, sign up, login) .
- Open GA4 DebugView to confirm events are firing.
- Use Tag Assistant to verify browser-side GA4 setup.
Tip: You only need the Measurement ID to begin. Refund tracking and
enhanced features require a Pro plan.
Google Ads Integration #
Track remarketing events and enable enhanced conversion tracking for better optimization.
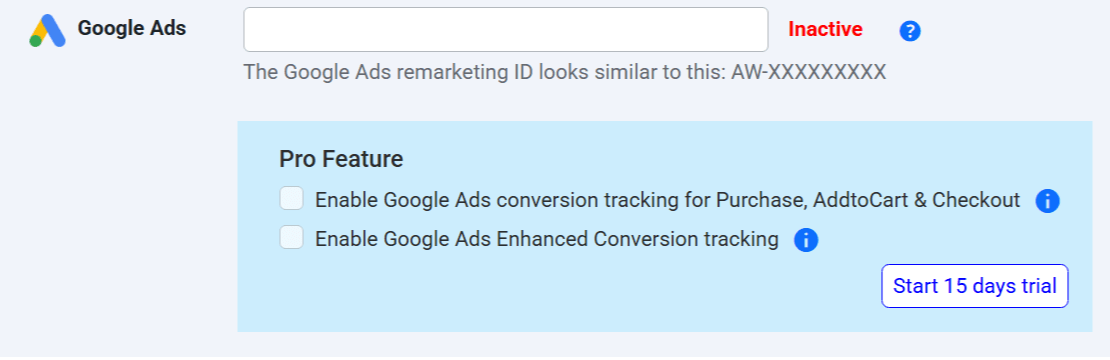
- Go to Conversios → Pixel & Analytics → Google Ads.
- Eter your Google Ads Remarketing ID (e.g.,
AW-123456789) to enable remarketing tracking. - Enable conversion tracking for events like Purchase, Add to Cart, and Checkout. [Pro Only]
- Turn on Enhanced Conversions to improve attribution accuracy. [Pro Only]
- Click Start 15-Day Trial to unlock Pro features if you’re on the free plan. You won’t be charged during the trial.
To test if tracking is working:
– Trigger actions like Add to Cart or Purchase on your site
– Use Google Tag Assistant or GA4 DebugView to check if events are firing
– In your Google Ads account, go to Tools → Conversions to see incoming data
* Remarketing is available in the free plan.
* Conversion tracking and Enhanced Conversions require Pro.
Meta (Facebook) Pixel Integration #
Track Meta ads performance across page views, leads, add-to-cart, and purchases with pixel and server-side tracking support.
![]()
- Go to Conversios → Pixel & Analytics → Facebook.
- Paste your Meta Pixel ID (e.g.,
123456789012345) to enable browser-based event tracking. - Add your Meta Access Token to activate Conversion API (CAPI) tracking. [Pro Only]
- Click Start 15-Day Trial to enable server-side event tracking if you’re on the free plan.
- Click the blue Save button to apply changes.
To test your setup:
– Open your site and perform actions like page view, add to cart, or purchase
– Go to Meta Events Manager → Test Events to confirm events are firing
– If CAPI is active, check for both browser and server events
* Meta Pixel tracking is available on the free plan.
* CAPI improves match quality and iOS tracking accuracy. [Pro Only]
Tiktok Pixel Integration #
Track TikTok ad events like page views, signups, add-to-cart, and purchases with both pixel and Events API tracking.
![]()
- Go to Conversios → Pixel & Analytics → TikTok.
- Paste your TikTok Pixel ID (e.g.,
C0ABCDE123456789012) to enable browser-side tracking. - Enter your TikTok Events API Token to activate server-side tracking via Events API. [Pro Only]
🔐 Generate this token from: TikTok Events Manager → Web Events → Manual Setup → Create Token - Click Start 15-Day Trial if you’re on the free plan to unlock server-side tracking.
- Click the blue Save button to apply changes.
To test your setup:
– Perform key actions like page view, sign-up, or add to cart
– Go to TikTok Events Manager → Test Events to confirm event tracking
– If both pixel and API are active, check that deduplication is working correctly
* TikTok Pixel tracking is available in the free plan.
* Events API tracking improves accuracy and is available in Pro only. [Pro Only]
Snapchat Pixel Integration #
Track conversions from Snapchat ads including page views, form submissions, and purchases using both pixel and CAPI tracking.
![]()
- Go to Conversios → Pixel & Analytics → Snapchat.
- Paste your Snapchat Pixel ID (e.g.,
3a1b2c3d-1234-5678-abcd-9876543210ef) to enable browser-side tracking. - Enter your Snapchat CAPI Token to enable server-side tracking. [Pro Only]
🔐 Generate this from: Snapchat Ads Manager → Events Manager → Create Token. - Click Start 15-Day Trial if you’re on the free plan to activate CAPI tracking.
- Click the blue Save button to apply changes.
To test your setup:
– Trigger key actions like page view or purchase on your site
– Go to Snapchat Events Manager to confirm events are received
– If both pixel and CAPI are active, check for correct deduplication
* Snapchat Pixel tracking is included in the free plan.
* Conversions API improves match quality and is available in Pro only. [Pro Only]
Microsoft Ads (UET) Integration #
Track ad performance from Microsoft Ads (Bing) including purchases, cart actions, and page visits using UET tags.
![]()
- Go to Conversios → Pixel & Analytics → Microsoft Ads.
- Paste your UET Tag ID (e.g.,
12345678) to enable browser-side tracking of purchases, add-to-cart, and checkout events. - Enable enhanced attribution through server-side tracking for better accuracy. [Pro Only]
- Click the blue Save button to apply your settings.
To test your setup:
– Use the Microsoft UET Tag Helper Chrome Extension
– Visit your site, browse products, or complete a test purchase to validate event triggers
* Basic Microsoft Ads tracking is available in the free plan.
* Enhanced server-side tracking for more accurate attribution is available in Pro. [Pro Only]
LinkedIn Insight Tag Integration #
Track conversions and engagement from LinkedIn Ads using the LinkedIn Insight Tag.

- Go to Conversios → Pixel & Analytics → LinkedIn.
- Paste your LinkedIn Partner ID (e.g.,
123456) to activate browser-based tracking. - Click the blue Save button.
* Works on the free plan and tracks standard events like page views,
form submissions, and purchases.
Pinterest Tag Integration #
Track Pinterest ad events such as product views, add-to-cart actions, and purchases.
![]()
- Go to Conversios → Pixel & Analytics → Pinterest.
- Paste your Pinterest Tag ID (e.g.,
2612345678901) to enable tracking. - Click the blue Save button.
* Available on the free plan and helps optimize Pinterest campaign performance.
Twitter (X) Tag Integration #
Track Twitter/X ad conversions such as page views, add-to-carts, and purchases.
![]()
- Go to Conversios → Pixel & Analytics → Twitter.
- Paste your Twitter Pixel ID (e.g.,
o1a2b) to enable tracking. - Click the blue Save button.
* Supported on the free plan. Useful for retargeting and measuring campaign performance.
Session Recording & Heatmaps #
Analyze user behavior using heatmaps, session replays, and scroll tracking.
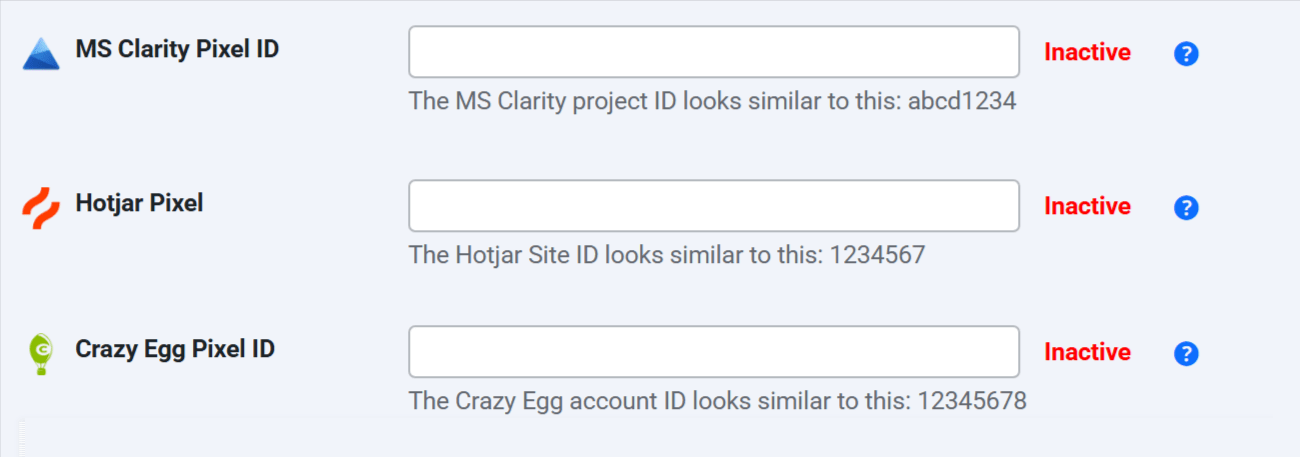
- Go to Conversios → Pixel & Analytics → Session Recording Tools.
- Enter your tracking codes:
– Hotjar Site ID (e.g.,1234567)
– Microsoft Clarity Project ID (e.g.,abcd12345)
– Crazy Egg Script Code (paste the full JS snippet) - Click the blue Save button.
* These tools work independently from ad pixels and don’t require extra plugins.
Great for improving user experience and conversion rates.
Next Steps & Recommendations #
Now that your marketing and analytics pixels are connected:
– Use tools like GA4 DebugView, Meta Pixel Helper, and Tag Assistant to test your event tracking.
– Check your Reporting Dashboard for real-time performance insights.
– Turn on server-side tracking (Meta CAPI, TikTok Events API, Enhanced Conversions) to improve match quality and attribution. [Pro Only]
Need Support? #
Explore more docs:
– Product Feed Setup Guide
– Reporting Dashboard Overview
📽️ Watch the full walkthrough
📅 Book a free setup call