Finding it difficult to set up Microsoft Ads conversion tracking for your Shopify store?
We won’t blame you. It can be a tough job if you are lacking technical knowledge.
Worry Not!
We are here to help you and make your Bing pixel integration with Shopify easier.
Follow the instructions mentioned and you would be able to add Microsoft ads conversion tracking to Shopify by the end of the blog.
Before we start, let’s have a look at what Bing Pixel actually is?
What is Microsoft Ads Pixel?
Microsoft Ads Pixel is a code snippet that you add to your website to track user behavior and measure the effectiveness of your Microsoft Advertising campaigns. The pixel can track a variety of events, such as website visits, form submissions, and product purchases.
This information can then be used to improve your campaigns by optimizing your bidding strategies. It eventually leads you to higher conversions and revenue.
Using Microsoft Ads Pixel, you can:
- Track conversions: The pixel can track conversions, such as website visits, form submissions, and product purchases. This information can be used to measure the effectiveness of your campaigns and to optimize your bidding strategies.
- Target your ads more effectively: The pixel can help you target your ads more effectively by collecting information about the people who visit your website. This information can be used to create custom audiences that are more likely to be interested in your products or services.
- Improve your ad copy: The pixel can help you improve your ad copy by collecting information about the pages on your website that people are visiting. This information can be used to create more relevant and compelling ad copy.
There are plenty of more benefits, but end goal of every benefit is increase in your conversions. ( surely it’s your end goal as well).
Now, you have understand all the methodologies and long talks…. but the thing is how to do it? Well…. a quick and easy-to-understand answer is given below.
Steps For Microsoft Ads Conversion Tracking In Shopify Store
You have to do a very less effort in compare to manually implementing Microsoft Ads pixel on your Shopify store. In just 3 easy steps ( only takes 5-7 minutes of yours), you can add Microsoft Ads pixel to your Shopify store.
Let’s snoop into the steps >>
1. Install the ‘Conversios’ app
The first step is to download and install the ‘Conversios ( GA4 and Ads Tracking ) App’. Once you have completed the installation, proceed with the onboarding process.
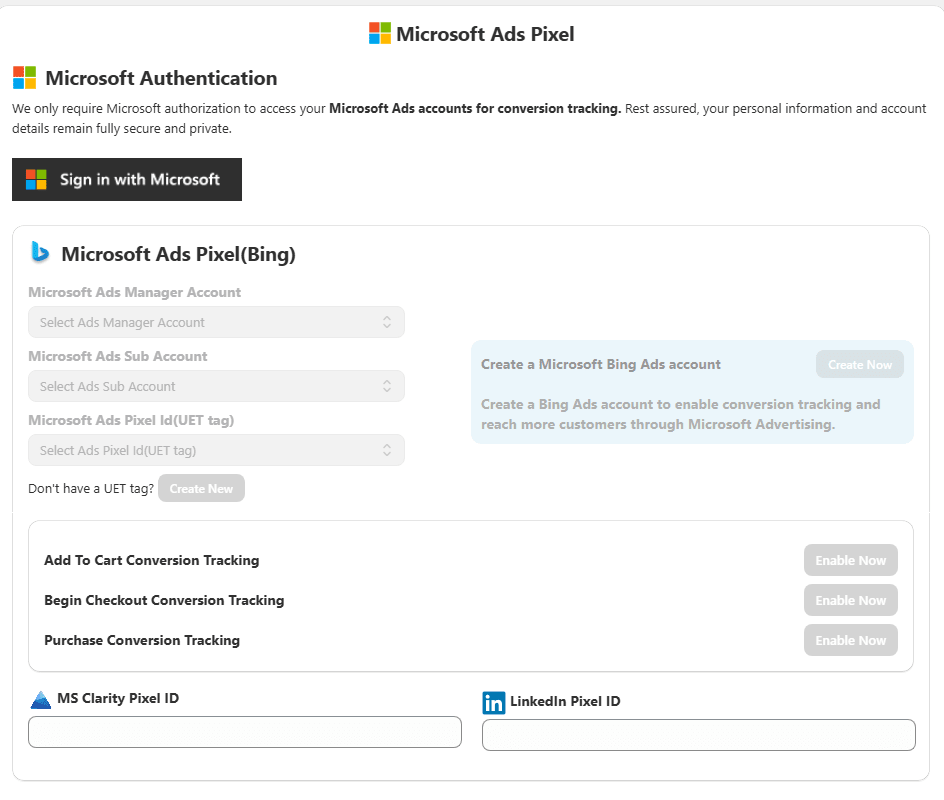
By clicking on “App settings’ you will reach an interface where you can see various pixel settings. Click on ‘Microsoft Ads (Bing) pixel settings as you want to set up Microsoft Ads pixel to your Shopify store.
2. Create Microsoft Ads pixel (UET tag)
[ If you have already created Microsoft Ads pixel- just find the Microsoft Ads pixel ID. Here’s how to find your Microsoft Ads pixel ID from Microsoft Ads manager account. ]
To create a Microsoft ads pixel (UET tag), you have to log into your Microsoft Ads Manager account.
You will find a ‘Tools’ button on the top-right of your screen, first, click on it.
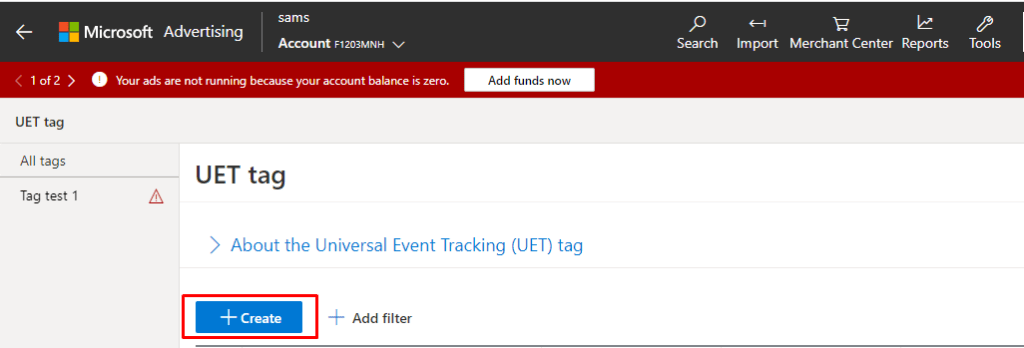
Navigate to the ‘Conversion Tracking’ section and then click on ‘UET tag’.
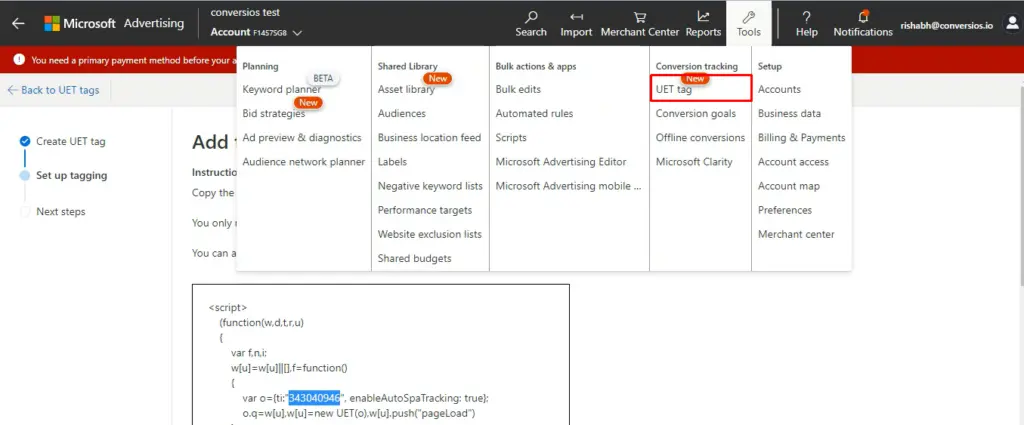
Once you click on it, you see the option to Create a new tag. By clicking on it, you will redirect to a new section.
Now you need to enter the UET tag name and UET tag description.
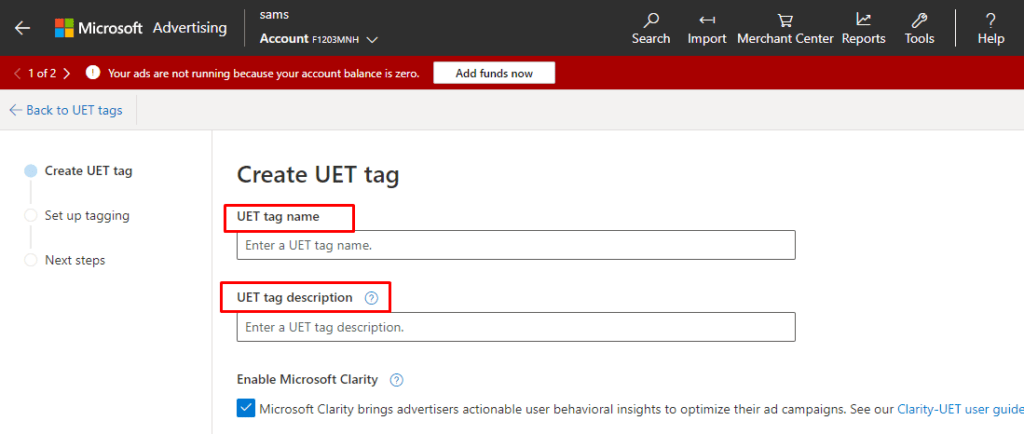
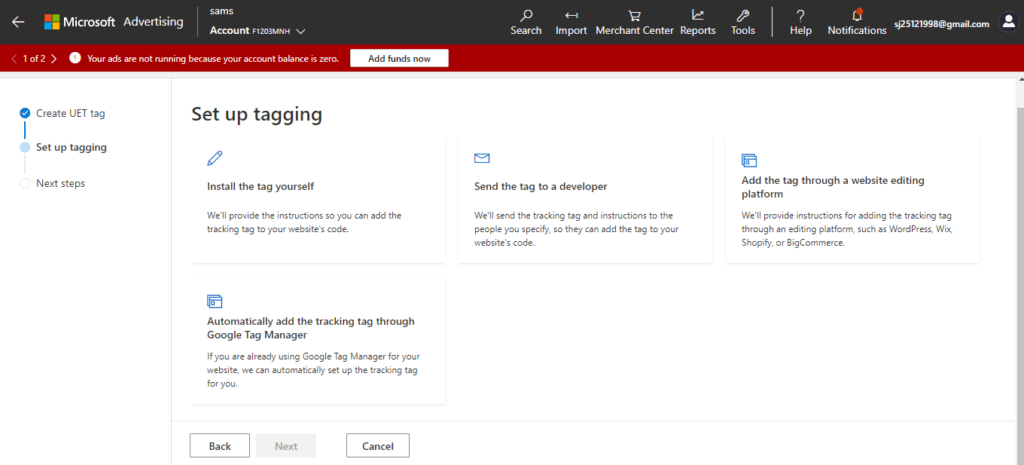
The next step will ask you to set up tagging options. You will find options like:
– Installing the tag yourself
– Sending the tag to your developer
– Adding tag through the website editing platform
– Automatically adding tags through GTM.
Choose the ‘website editing platform’, click on ‘next’ and then click on ‘Shopify’.
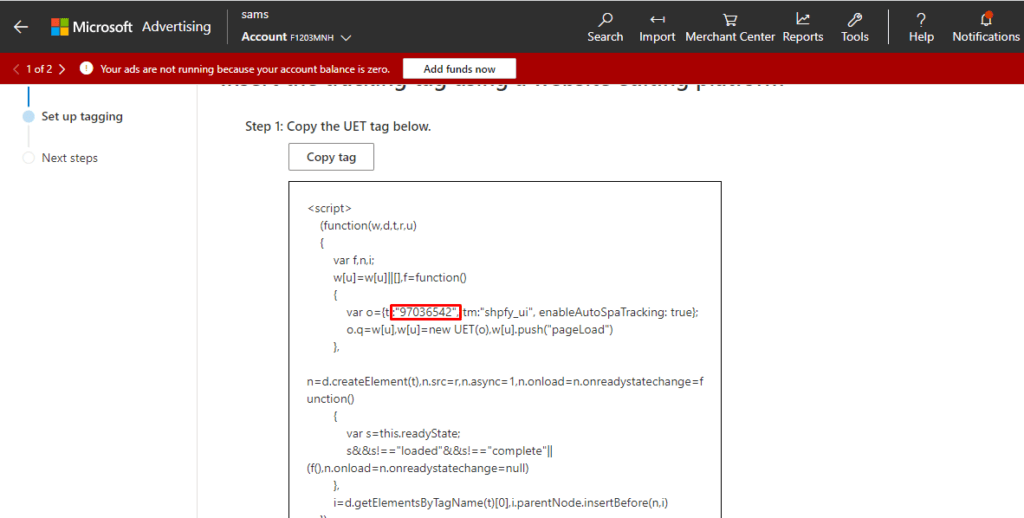
Now the final step is to get the ‘UET tag‘ from the script and paste it to the website using the Shopify store.
3. Paste the code in the Shopify store backend
Go to your Shopify store and click on the ‘All-in-one Pixel manager’ app and then click on ‘App settings’.
You will find the ‘Microsoft Ads (Bing) pixel ID’, paste the ID you have copied here.
Finally & Successfully you have added Microsoft Ads pixel to your Shopify store… but what? Do you validate your pixel whether it’s integrate properly or not? Whether it will show the accurate data or not?
To get the answer of these questions– here’s a easy breakdown.
Validate The Microsoft Ads Pixel ID
Once you successfully set up and integrate Microsoft Ads pixel with your Shopify store, you should verify whether the Microsoft Ads pixel is properly integrated or not.
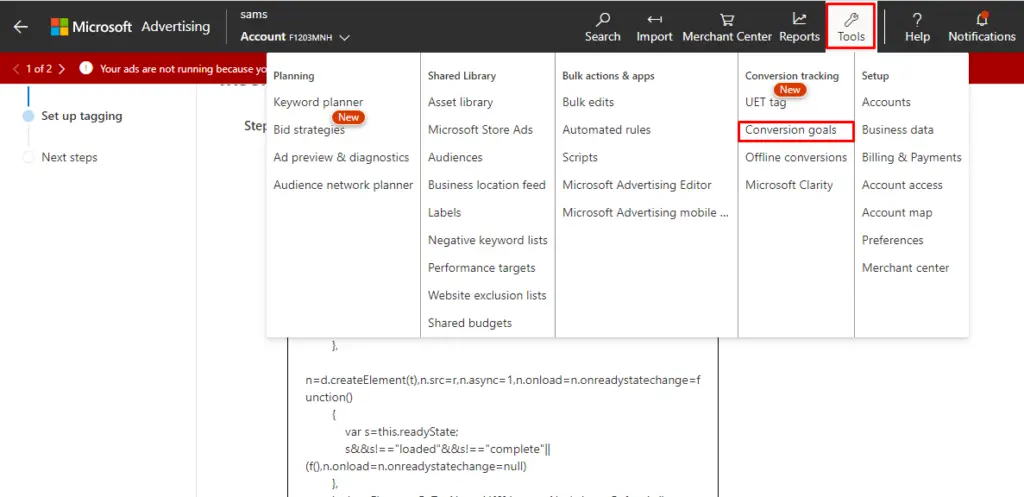
Firstly go to your Microsoft ads account. Navigate to ‘Tools’ and select ‘Conversion Goals’.
Now find the conversion goal that you already created for the pixel. If you haven’t created the conversion goal, check out this blog.
Here in the conversion tracking tag section, you need to ensure the ‘active’ status of the tag and that it is properly installed on your website.
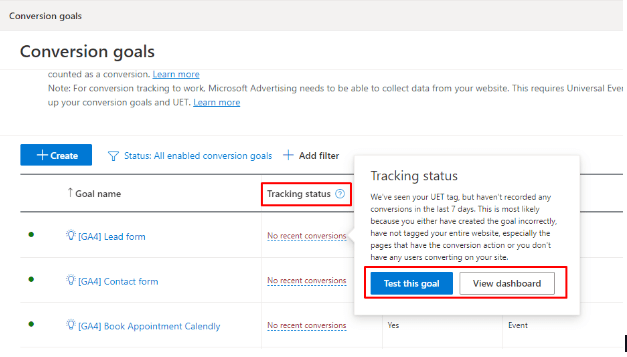
To verify, perform the test conversion on your website. Let’s say complete a test purchase or fill out a form.
Now, wait for a few seconds and it will display that the test conversion has been tracked by the pixel.
If you want to validate your Microsoft Ads Conversion Tracking, here’s helpful tutorial for you.
So, from this– you will get to know about whether your Microsoft pixel is added to your Shopify store or not. What if it doesn’t integrate properly? So, here’s some troubleshooting steps that will surely help you.
Troubleshooting Steps for verifying your Microsoft Ads pixel
If you are facing any issues or challenges then you can try below given things:
- Double check the pixel code is properly installed
- Ensure the pixel is associated with the correct conversion goal
- Identify if there’s any conflict between Microsoft Ads pixel and other tracking codes on the website
- Try and test Microsoft Ads pixel with various conversion actions to see the functionality
Benefits of Microsoft Ads Conversion Tracking
Why you are using any tool, plugin or pixel? Just to get benefits of it an make your ECommerce store tracking easier. Right? So, check out the benefits of Microsoft Ads Pixel for your Shopify store. ( There are plenty, but mentioning the best 4).
- Conversion Tracking
The Microsoft Ads pixel enables marketers to track the activities that people do after clicking on a Microsoft Ads ad on their website. This might involve buying something, filling out a form, or signing up.
You can understand the impact of your marketing campaigns and improve their performance by doing Microsoft ads conversion tracking.
- Audience Targeting
You can also build custom audiences based on particular activities customers take on your website by integrating the Microsoft Ads pixel.
Based on past behavior, this can assist in identifying users who are most likely to be interested in your products or services.
Additionally, you can use custom audiences to exclude particular user groups from marketing campaigns, such as those who have previously purchased.
- Remarketing
Using the Microsoft Ads pixel, you can create retargeting lists depending on the actions that website visitors take.
Using these lists, you can present customers with relevant advertising based on their past online behavior, such as ads for items they have already seen or left in their shopping cart.
As a result, advertising campaigns may be more successful and result in more conversions.
- Enhanced Reporting
The Microsoft ads pixel gives you greater insight into your ad campaigns. The information includes the performance of various campaigns & keywords.
Overall, integrating the Microsoft Ads pixel into a website could help you better track and enhance your ad campaigns.
Enhanced your marketing Efforts with Microsoft Ads pixel For Shopify
Adding the Microsoft Ads pixel to your Shopify store with the Conversios app can transform your Ecommerce store.
Taking data-driven decisions is not far away from you as Microsoft Ads pixel gives you some useful insights on user behavior.
If you’re not using the Microsoft Ads pixel, I encourage you to give it a try. It’s an excellent way to improve your marketing efforts and get more out of your advertising campaigns.
Along with the Microsoft Ads pixel, the Conversios app supports the integration of other pixels such as the Facebook pixel, Snapchat pixel, TikTok pixel, Twitter pixel, and Pinterest pixel.
Thanks for reading the article. Make sure to share as much as you can to make integration of Marketing Pixels to Shopify store easier. And yes, follow Conversios to have such amazing and easy guides for your ECommerce stores.
Frequently Asked Questions
Q. What is Microsoft Ads Pixel and why is it important for Shopify?
Microsoft Ads Pixel is a code snippet used to track user behavior and conversions on your Shopify store. It helps measure the effectiveness of ad campaigns, optimize bidding strategies, and improve targeting and reporting.
Q. How can I add Microsoft Ads Pixel to my Shopify store?
You can add it using the Conversios Pixel Manager App. Simply install the app, create a Microsoft Ads (UET) Pixel, and paste the Pixel ID into the Microsoft Ads Pixel settings within the app.
Q. How do I verify if my Microsoft Ads Pixel is working correctly?
After integration, go to your Microsoft Ads Manager → Conversion Goals → check the tag status. Perform a test conversion to ensure the tag is firing and tracking properly.
Q. What should I do if the Microsoft Ads Pixel is not tracking conversions?
Check that the pixel code is correctly installed, linked to the correct goal, and doesn’t conflict with other scripts. Also, validate using a test conversion.
Q. What are the benefits of Microsoft Ads Pixel for Shopify?
Benefits include conversion tracking, audience targeting, retargeting, and enhanced ad reporting, all of which improve campaign performance and ROI.