Inaccurate Google Ads conversion tracking in Shopify can have detrimental effects on advertising efforts, leading to misallocation of ad spend, ineffective campaign optimization, challenges in measuring ROI, difficulty in identifying successful strategies, wasted ad budget, and a lack of valuable insights for decision-making.
Additionally, the inability to accurately demonstrate the value of campaigns may impact stakeholder trust.
To avoid these issues right from the start, it’s crucial to set up the Google Ads conversion tracking the right way in Shopify.
Let’s dive in.
How to Set Up Google Ad Conversion Tracking on Shopify
There are three ways to set up Google Ad conversion tracking: manual installation, through the Shopify checkout setting, and with Conversios App.
We have given a step-by-step process for each method. Refer carefully to all three methods and steps mentioned to get started successfully.
1. How to Set Up Google Ads Conversion Tracking with Manual Installation
Step 1: Create a conversion action in Google Ads
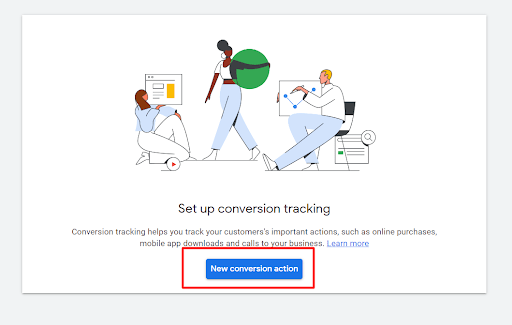
The first step you need to set up Shopify Google ads conversion tracking by following Google Ads instructions to create a conversion action.
Generally, conversion action is tracking purchases as it helps E-commerce business owners understand how effectively their ads bring new sales and revenue.
To set conversion action, you need to set the category to “Purchase/Sale” and the value to “Use different values for each conversion” to track your purchases effectively.
Once you are done creating your conversion action, click CREATE AND CONTINUE.
Step 2: Install the Google tag in your Shopify Theme Code
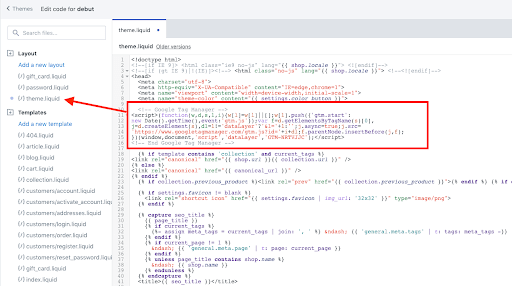
Once you have created an action, you need to install the tag in your Shopify theme code.
The steps depend on your tag ID (AW- or G-)
Here are the steps for both:
For Google Ads (AW-) Tags:
- Log in to your Shopify store’s admin dashboard.
- In the Shopify admin, go to “Online Store.”
- Under Online Store, click on “Themes.”
- In the Themes section, find and select the theme where you want to install the Google Ads tag. Click “Actions” and choose “Edit Code.”
- Locate and open the “theme.liquid” file
- Paste the Google Ads tag code provided by Google into the “theme.liquid” file, which may look like this:
<!– Global site tag (gtag.js) – Google Ads: AW-xxx –>
<script async src=”https://www.googletagmanager.com/gtag/js?id=AW-xxx”></script>
<script>
window.dataLayer = window.dataLayer || [];
function gtag() {
window.dataLayer.push(arguments);
}
gtag(‘js’, new Date());
gtag(‘config’, ‘AW-xxx’);
</script>
- Now save the changes in your theme code.
- Test your tag by using Google Tag Assistant or Google Ads conversion tracking tools.
- Publish your changes once you confirm that they are working.
For Google Analytics (G-) Tags:
- Log in to your Shopify store’s admin dashboard.
- Go to “Online Store.”
- Under Online Store, click on “Themes.”
- Now, find and select the theme where you want to install the Google Analytics tag.
- Click “Actions” and choose “Edit Code.”
- Depending on your specific Google Analytics setup, you may insert the tag code in the “theme.liquid” file or a dedicated section if specified by Google Analytics.
- Now, paste the Google Analytics tag code provided by Google into the appropriate location. It will be specific to your Google Analytics property.
- After inserting the code, save the changes in your theme code.
- Use Google Tag Assistant or Google Analytics Real-Time reports to ensure data is tracked correctly.
- Once you’ve verified the tag is working, publish your theme to make the changes live on your online store.
Step 3: Install the event snippet
Once you have installed the Google tag, it’s time to add the event snippet to your checkout page. The purpose of the event snippet is to track the conversions.
Here’s how to add the event snippet to your Shopify checkout page.
- In Google Ads, select “Page load” in the Event snippet section and copy the code.
- In your Shopify admin, go to Settings > Checkout.
- Paste the event snippet into the “Additional scripts” text box below any existing code.
- Add the Google tag above the event snippet.
- Save your changes.
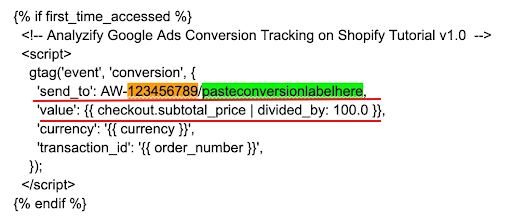
To prevent duplicate conversions, add “{% if first_time_accessed %}” before the snippet and “{% endif %}” after it. Plus, replace ” (blank) with ‘{{ order_id }}’ next to ‘transaction_id’.
If your default currency is not USD, replace ‘USD’ with ‘{{ currency }}’ in the event snippet.
Step 4: Make the conversion value dynamic.
If you are running two ads simultaneously with different values, it’s important to set customized conversion values to track the sales more effectively.
Here’s how you can do it:
- In your Shopify admin, head to Settings > Checkout.
- In the “Additional scripts” box, locate the event snippet from Step 3.
- Replace the line starting with ‘value’ with one of these options:
To exclude taxes and shipping from the conversion value: ‘value’: {{ checkout.subtotal_price | divided_by: 100.0 }},
To include taxes and shipping in the conversion value: ‘value’: {{ checkout.total_price | divided_by: 100.0 }},
- Save your changes.
Your script will now adapt to the unique value of each transaction, giving you better and transparent insights.
2. How to Set Up Google Ads Conversion Tracking via Shopify Checkout Settings
The other way to set up Google Ads conversion tracking is through Shopify Checkout Settings. Here’s a step-by-step guide for the same.
Step 1: Open Shopify Checkout Settings
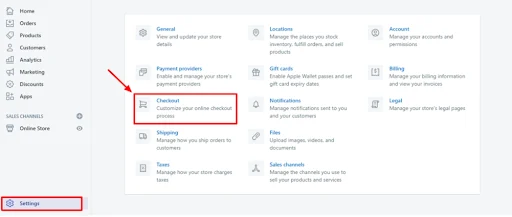
Login to the Shopify admin panel, navigate to Settings (gear icon), and choose checkout
Step 2: Setup and Copy Your Google Ads Conversion Code
- Log in to Google Ads.
- Click on the tools and settings menu visible in the top right corner.
- Select “Conversions” under the Measurement column.
- Click on “New Conversion Action.”
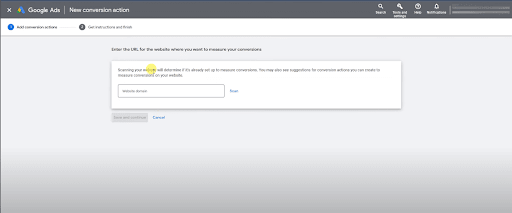
- Now, select the website as your tracking template.
- Enter the URL and click on scan.
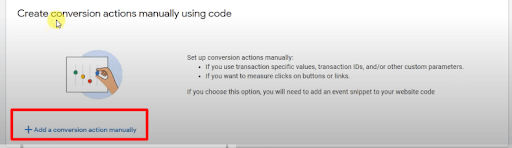
- Scroll to the bottom and choose “Add a Conversation Action Manually.”
- Once you have selected manual conversation action, fill in the categories of conversion name, category, value (set different values for each conversion, if applicable), attribution model (position-based is recommended), and other fields.
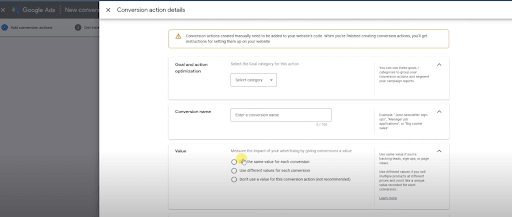
- Click “Create and continue” and then “Save and continue.”
- Next, click on “See event tag.”
- Copy-paste your “Event Snippet” here and click on “Done.”
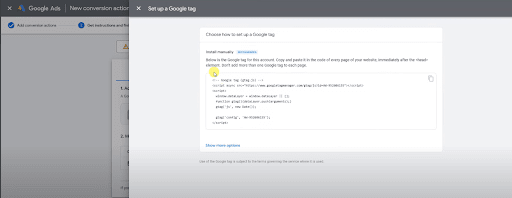
Note: You can save the Event snippet on a file or Doc for future use.
To track your conversions with better accuracy, it’s recommended to enable enhanced conversions.
Remember, enabling enhanced conversions is an optional activity and not a necessity. If you can’t see that option (or don’t want to do it, you can skip to step 3)
Here’s how you can enable enhanced conversions:
- Go to https://ads.google.com/aw/conversions/customersettings or go to Tools and Settings > Conversions > Settings
- When you check the “Turn on enhanced conversions for leads,” you will see the “terms and conditions” prompt; confirm it to get to the next step.
- Now you will see an option to choose between Google Tag and Google Tag Manager – choose Google Tag and click on Tag details.

- Now click on Tag Details and check the box next to “Specify CSS selectors or JavaScript Variables.”
- Change CSS Selectors to Global Javascript variable.
- Now, enter the values for email, phone, first name, last name, street address, city, country, and postal code.
Here are the respective values for each:
enhanced_conversion_data.email
enhanced_conversion_data.phone_number
enhanced_conversion_data.first_name
enhanced_conversion_data.last_name
enhanced_conversion_data.home_address.street
enhanced_conversion_data.home_address.city
enhanced_conversion_data.home_address.region
enhanced_conversion_data.home_address.country
enhanced_conversion_data.home_address.postal_code
The reason for using javascript values specifically in these codes is because when you use conversion tracking code, all the codes on the thank you page get stored as JavaScript variables.
Step 3: Editing and Pasting Your Google Ads Conversion Tracking
Now, go back to Shopify and scroll down to “Order Processing.”
At the bottom, you will see “additional scripts.”
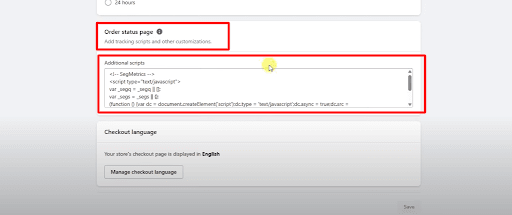
If you have two fields of “post-purchase” and “order status,” you need to add the code to the order status field.
The next step is to replace the ‘fa_send_to’ value with the send_to value.
We have given the code below for your reference.
<!–Event snippet for Shopify conversion page –>
<script>
gtag (‘event’, ‘conversion’, {
‘send_to: ‘your event snippet value’,
‘value’: 1.0,
‘currency’: ‘your currency’,
‘transaction_id’: ”
});
</script>
In the code, replace values wherever mentioned.
If you want to include the shipping and taxes in the checkout value, choose yes, and if not, choose no for “fa_include_tax_and_shipping”
<!– Your Conversion Tracking Code –>
<!– Set your conversion ID and other relevant values –>
{% assign fa_send_to = ‘YOUR_CONVERSION_ID’ %}
{% comment %}DO NOT EDIT BELOW{% endcomment %}
{% if fa_google_coding %}{% assign fa_google_coding = true %}{%- else -%}{% assign fa_google_coding = false %}{%- endif -%}
{% assign fa_google_ids = fa_send_to | split: “/” %}
{% if fa_google_coding == false %}
<script async src=”https://www.googletagmanager.com/gtag/js?id={{fa_google_ids[0]}}”></script>
{%- endif -%}
<script>
window.dataLayer = window.dataLayer || [];
function gtag(){dataLayer.push(arguments);}
gtag(‘js’, new Date());
gtag(‘config’, ‘{{fa_google_ids[0]}}’, {‘allow_enhanced_conversions’: true});
var checkout = window.Shopify.checkout;
</script>
{% if first_time_accessed %}
<script>
gtag(‘event’, ‘conversion’, {
‘send_to’: ‘{{ fa_send_to }}’,
‘value’: checkout.total_price_set.presentment_money.amount,
‘currency’: checkout.total_price_set.presentment_money.currency_code,
‘transaction_id’: ‘{{ order_id }}’,
});
var enhanced_conversion_data = {
{% unless billing_address.first_name == blank %}”first_name”: “{{ billing_address.first_name }}”,{% endunless %}
{% unless billing_address.last_name == blank %}”last_name”: “{{ billing_address.last_name }}”,{% endunless %}
{% unless checkout.email == blank %}”email”: “{{ checkout.email }}”,{% endunless %}
{% unless billing_address.phone == blank %}”phone_number”: “{{ billing_address.phone }}”,{% endunless %}
“home_address”: {
{% unless billing_address.street == blank %}”street”: “{{ billing_address.street }}”,{% endunless %}
{% unless billing_address.city == blank %}”city”: “{{ billing_address.city }}”,{% endunless %}
{% unless billing_address.zip == blank %}”postal_code”: “{{ billing_address.zip }}”,{% endunless %}
{% unless billing_address.country_code == blank %}”country”: “{{ billing_address.country_code }}”{% endunless %}
}
};
</script>
{% endif %}
<!– End of Your Conversion Tracking Code –>
In this modified code, replace ‘YOUR_CONVERSION_ID’ with the actual conversion tracking ID you want to use for your E-commerce store.
Step 4: Verifying and Testing
Last but not least is to verify the code’s functionality by going to Google Ads > Tools and Settings > Conversions > check if the status is verified.
Moreover, it is recommended to make a test payment to check if the tracking is working properly. Check the data in the Tag Assistant when you reach the thank you page.
Note:
The first_time_accessed is for the backend, not for the customers. In the future, if the same person makes additional orders using a different browser session, the “first_time_access” check will be performed again.
3. How to Set Up Google Ads Conversion Tracking on Shopify Using Conversios App?
The first two methods of Google Ads conversion tracking require much technical knowledge, time, and effort for the setup. But when you use Conversios, you set up your Google Ads Conversion tracking on Shopify very easily.
Here’s how to do it:
Step 1: Log in to your Shopify store
Step 2: Go to Apps and search for Conversios GA4 & Ads Tracking
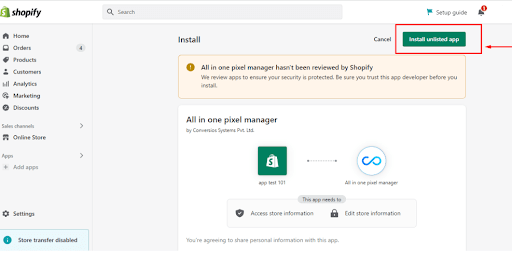
Step 3: Click on “Install App”
Step 4: Now, navigate to the Shopify store & click on “Add App”
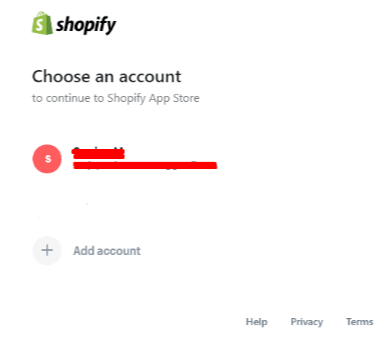
Step 5: You will see a Shopify Accounts Login Page; select/log in to the preferred account
Step 6: After selecting the account, you will get a pop-up to select the software where you want to install the app.
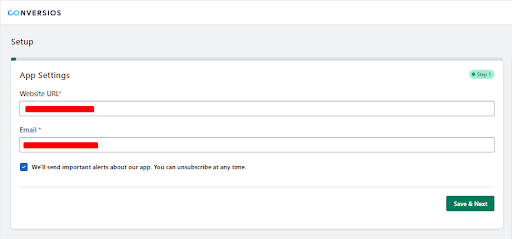
Step 7: To activate the app, go to the app settings or configuration app page
Step 8: Now add the website URL and email ID you want to configure with the App
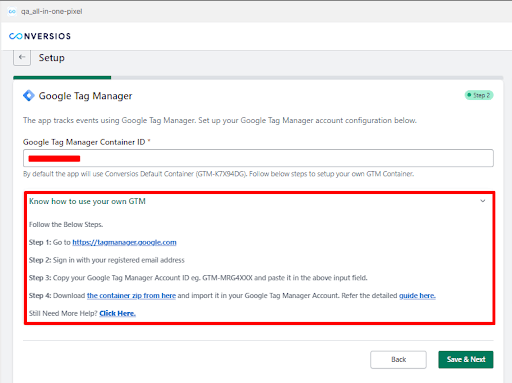
Step 9:You will now see the option of integrating Google Tag Manager to track your events.
Step 10: In the same way, you can integrate your Google Ads conversion ID and Label

Track Your Shopify Google Ads Conversion With Conversios!
Tracking Google Ads conversions on the Shopify store is super important for your E-commerce business success. However, manual setup can be complex and time-consuming.
But we have got a solution for you! With Conversios, you can effortlessly integrate Google Tag Manager, Google Ads conversion ID, and Label to track conversions accurately.
Leverage our user-friendly E-commerce marketing analytics solution to make data-driven decisions, optimize ad campaigns, and maximize ROI.
Frequently Asked Questions
Q. Why is accurate Google Ads conversion tracking important for Shopify stores?
Accurate tracking helps avoid wasted ad spend, improves ROI measurement, enables better optimization, and builds trust with stakeholders by clearly showing campaign performance.
Q. What are the different methods to set up Google Ads conversion tracking in Shopify?
There are three main methods: 1) Manual installation, 2) Shopify checkout settings, and 3) Using the Conversios GA4 & Ads Tracking App.
Q. How do I manually set up Google Ads conversion tracking on Shopify?
You need to create a conversion action in Google Ads, install the global tag in your Shopify theme, add an event snippet in the checkout script, and make the conversion value dynamic based on subtotal or total price.
Q. What is the advantage of using Shopify checkout settings for conversion tracking?
This method simplifies the process and allows you to paste the event snippet directly into the order processing section, with optional enhanced conversions for better accuracy.
Q. How does enhanced conversion tracking improve performance?
Enhanced conversions send hashed customer data (like email and address) to Google, helping match conversions more accurately and improve attribution.
Q. Can I include taxes and shipping in the conversion value?
Yes. You can choose whether to include or exclude taxes and shipping when setting up the dynamic conversion value in your tracking script.
Q. What are the benefits of using the Conversios app for conversion tracking?
Conversios automates the entire setup — from Google Tag Manager to Ads integration — reducing errors, saving time, and making tracking more accurate without requiring technical expertise.
Q. How do I test if my Google Ads conversion tracking setup is working on Shopify?
Use Google Tag Assistant or the Google Ads Conversion section to verify your tag status. It’s recommended to run a test transaction and confirm that the conversion is being tracked.